
Most businesses today use emails to communicate with clients. This makes phishing the ideal tool for duping unsuspecting customers. Sending emails from a fake address is not very difficult for skilled fraudsters. This is prevalent because many businesses today fail to employ additional security measures to protect their addresses when contacting subscribers or customers via email.
Fraudsters send emails pretending to be genuine senders in the hope of acquiring the client’s confidential information, such as address, social security number, bank account details, etc. Adding a digital signature to outgoing emails verifies the sender’s identity, eliminating identity theft and safeguarding the intended recipients.
What is a Digital Signature for Email?
A digital signature verifies the sender’s identity, adding a second layer of security to an email message. The digital signature comprises your certificate and public key and originates from your digital ID. You can digitally sign messages with your unique digital mark, signaling to email servers that the contents of the email message haven’t been tampered with.
A digital signature serves three fundamental purposes:
- It verifies the sender’s identity
- It affirms that the email contents are spam-free
- The sender takes complete responsibility for the email
Adding a digital signature to outgoing messages grants credibility. It proves the email’s origin as the identities of the company, and the person who digitally signed it are displayed to the recipient.
Digital Signature vs Electronic Signature
A digital signature is not the same as an electronic signature. Here are the primary differences.
| Digital Signature | Electronic Signature |
| Relies on public key infrastructure for authentication | Legally valid replacement for a handwritten signature |
| Created via cryptographic algorithms | Offers lower security |
| Licensed by a trusted certifying authority | Not certified by a legal authority |
| Secures the document | Verifies the document |
| Authenticated using a digital signature certificate | Authenticated using SMS or voice call |
Certification Trust Levels
A recognized authority must certify the pair of keys used to encrypt digitally signed messages. There are three levels of quality assurance certificates, depending on how they perform identity checks.
Level 1
Class 1 certificates allow senders to secure email messages using an encryption key. They offer basic protection and are not recommended for commercial use where proof of identity is required.
Level 2
Class 2 certificates are issued to employees, partners, associates, etc. who are ready to assume the responsibility of verifying the accuracy of the information submitted by their employees/ partners/ affiliates/customers.
Level 3
Class 3 certificates offer the highest security and are primarily used for commercial purposes. The level of trust is based on the authentication protocols used by the certifying authority to validate your credentials.
How to Create a Digital Signature
There are two main practices for creating a digital signature: S/MIME and OpenPGP. They operate on the same principle but utilize different data formats. Digital signatures are created using symmetric encryption. This implies that the sender obtains two keys from the generating algorithm: a public key and a private key.
The sender’s email server sends an encrypted mail. A public key is either sent via an attachment or the recipient fetches it from a public directory to validate the digital IDs. The receiving mail server decrypts the email message and verifies the results.
How to Add a Digital Signature to Outgoing Messages via Outlook
- On the File menu, click Options > Trust Center.
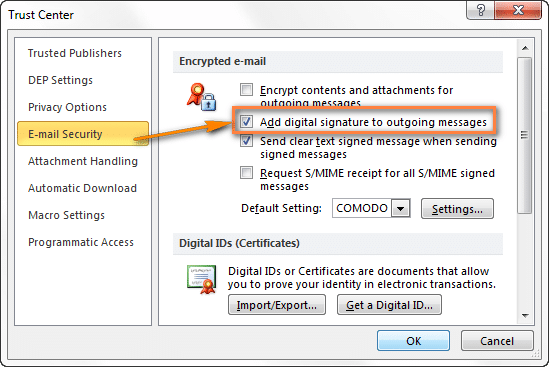
- Under Microsoft Outlook Trust Center, click Trust Center Settings > Email Security.
- Click Import/Export to import a digital ID from a file on your computer, or click Get Digital IDs to find a list of services that issue digital IDs for your use.
- In the message, click Options.
- In the More Options group, click the dialog box launcher in the lower-right corner.
- Click Security Settings, and then select the Add digital signature to this message check box.
- Compose your message and send it.
How to Add a Digital Signature to Outgoing Messages via Gmail
- Open Gmail.
- At the top right, click Settings > See all settings.
- In the Signature section, add your signature text in the box. You can also format your message by adding an image or changing the text style.
- At the bottom of the page, click Save Changes.
How to Digitally Sign Emails
Before you can digitally sign all messages, you have to create a digital ID. Here is a step-by-step breakdown of the process:
Select the Contents of your Digital Signature
Choose the information you want to display on the signed messages. Common data include your full name, your company’s name and address, phone number, and email address. You can also include your social icons for more credibility.
Pick a Design
You can get creative when using a digital signature. Simplistic formats are easily accessible on all browsers and devices and are therefore preferred. However, modern smartphones and tablets can display complex designs pretty efficiently. Choose a design that resonates with your brand and add it to the outgoing messages check box.
Choose Font and Text Color
Choosing the right font and text color is vital, as your digitally signed email message represents your brand. Use dark colors and bold fonts to highlight the verification information for greater email security.
Create a Secondary Plain Text Digital Signature
If you are using images or designs in your digital signature, you should consider creating a secondary plain text version from the email security tab. This text-only version will show up where the client’s browser doesn’t support imagery.
Best Practices for Creating a Digital Signature
Now that you understand how to create a digital signature for email, let’s walk you through the best practices to ensure your digitally signed emails perform optimally.
Keep It Simple
The most effective digital signatures contain minimal information. Avoid using too much text, design, or visuals to ensure a clutter-free look. Add your credentials, basic company details, and contact information to help readers validate your credentials quickly.
Consider What’s Relevant to the Recipient
The primary purpose of a digital signature is to validate the sender’s credentials. You should consider adding information that is relevant to the recipient. For example, your name, contact information, and designation. For best results, stick to the point to avoid confusion.
Align Your Digital Signature with Your Brand
If you insert images or add designs and colors to your digital signature, ensure it resonates with your brand’s image. Different colors and font styles may distract the reader. Therefore, we recommend using your brand colors in your signed messages to maintain homogeneity.
Make Your Digital Signature Accessible
Accessibility is a major concern in business and marketing emails. Therefore, you should ensure your digital signature is easily readable. We recommend adding a plain-text signature so that it’s accessible to screen readers.
Improve Email Deliverability and Conversion Rate
Digitally signed email messages offer greater security and peace of mind and are highly recommended for modern businesses. Book a discovery call today to learn how you can secure your outgoing messages and improve email deliverability with expert guidance.